KNOWLEDGE PAGE
We’re excited to introduce a new KNOWLEDGE section on our website, designed to help amateur radio operators—both new and experienced—gain a deeper understanding of HF operations and antenna technology. This section will cover essential topics such as HF antennas, QRP operations, HOA restrictions, installation techniques, ground planes, radials, counterpoises, and much more.
Whether you're setting up an antenna for the first time, optimizing your station for better performance, or working within the constraints of an HOA, this page will be your go-to resource for clear, practical, and technical guidance.
Below are just a few examples of the subjects that will be covered:
1. Understanding HF Antennas: Choosing the Right One for Your Needs
HF antennas come in various designs—end-fed, dipole, vertical, loop, and directional antennas. This section will break down the different types, their advantages, and which one suits specific operating environments, such as portable use, base stations, or stealth setups for HOA compliance.
2. QRP Operations: Making the Most of Low Power
Operating QRP (low-power HF transmission, typically 5W or less) is an art that requires efficiency in antenna setup, propagation knowledge, and operating skills. This topic will cover techniques to maximize signal reach, including antenna efficiency, propagation strategies, and the importance of matching your transceiver with the right antenna system.
3. HOA-Friendly Antenna Solutions
Many operators face restrictions in HOAs where traditional antennas are not allowed. This section will provide creative and effective solutions, such as stealth antennas, magnetic loops, attic-mounted antennas, and disguised installations, ensuring you stay on the air while staying compliant.
4. The Role of Ground Planes, Radials, and Counterpoises
For vertical and end-fed antennas, a proper ground system is essential for efficiency and signal radiation. This section will explain the difference between a ground plane, radials, and counterpoise, how to properly install them, and how they impact antenna performance on different bands.
5. Setting Up an Efficient Portable HF Station
Portable operations, such as POTA (Parks on the Air) and SOTA (Summits on the Air), require lightweight and efficient gear. This topic will cover essential elements like choosing the right antenna for quick deployment, battery power considerations, and propagation strategies for maximizing contacts in a field environment.
These are just a few examples of what will be covered in our KNOWLEDGE section. We’ll be continually adding new topics, practical guides, and technical breakdowns to help you become a more proficient HF operator. Stay tuned and check back regularly for updates!
TOPICS
Category
Understanding Counterpoise, Radials, and Ground Planes in Amateur Radio
Understanding Counterpoise, Radials, and Ground Planes in Amateur Radio
When setting up an antenna, particularly vertical antennas, you’ll often encounter the terms counterpoise, radials, and ground plane. Each of these components plays a crucial role in improving antenna efficiency and performance. Whether you’re using a CHA MPAS 2.0, CHA MCC, or CHA BV, understanding these grounding techniques will help you optimize your antenna system for better signal propagation, reduced losses, and increased efficiency.
Radials and Ground Systems: Cut vs. Uncut Radials
Radials are essential for many vertical antennas, acting as a reflective surface that enhances radiation efficiency and provides a return path for RF currents. However, radials can be either cut for a specific frequency or left uncut to cover a broader range of bands. Each approach has advantages and disadvantages, depending on your operating environment and antenna type.
Cut Radials for Specific Frequencies
Cut radials are sized precisely based on a quarter-wavelength of the desired frequency. These radials are tuned to work optimally within a specific frequency band.
Advantages:
- Maximum Efficiency – Cut radials provide the lowest ground losses and best impedance matching.
- Improved Performance for Target Bands – Ideal for optimizing efficiency on specific bands.
- Better SWR Matching – Helps reduce the need for additional tuning or external matching devices.
Disadvantages:
- Limited Bandwidth – Radials cut for one frequency won’t work as efficiently on other bands unless multiple sets of radials are used.
- More Complex Installation – Requires planning and precise cutting for each frequency band.
Example Applications:
- CHA MPAS 2.0: A 33-foot radial for 40m or a 16-foot radial for 20m enhances performance and reduces losses.
- CHA MCC: Works well with cut radials when used in a vertical configuration, maintaining resonance and improving performance.
- CHA BV: As a Basic Vertical antenna, it benefits from cut radials, ensuring optimal signal radiation.
Uncut (Random-Length) Radials
Uncut radials, also known as random-length radials, are used when a single set of radials needs to work across multiple frequencies. Instead of being tuned to a specific wavelength, they are often made longer than necessary to provide a broad return path.
Advantages:
- Multi-Band Compatibility – Provides flexibility for operating across different frequencies.
- Simpler Installation – No need to cut radials to exact lengths.
- Better for Portable or Emergency Use – Quick deployment without the need for frequency tuning.
Disadvantages:
- Lower Efficiency – Lacks the tuned resonance of cut radials, leading to potential signal loss.
- Variable Performance – Effectiveness depends on length, placement, and soil conductivity.
Example Applications:
- CHA MPAS 2.0: Works well with uncut radials (25-50 feet) in field deployments where frequency agility is required.
- CHA MCC: Can function with uncut radials in portable setups where ease of use is prioritized over peak efficiency.
- CHA BV: Can use longer radials to compensate for poor ground conditions, though cut radials remain preferable for peak performance.
Elevated Counterpoise for Better Performance
An elevated counterpoise consists of conductive elements positioned above ground, typically supported by poles or tripods. Raising the counterpoise minimizes interaction with lossy ground conditions, improving efficiency.
Why Use an Elevated Counterpoise?
- Reduces Ground Losses – Prevents RF energy from being absorbed by poor soil conditions.
- Improves Radiation Pattern – Helps achieve a more effective omnidirectional or directional pattern.
- Ideal for Temporary or Portable Operations – Particularly useful when installing antennas on non-conductive surfaces like concrete or rocky terrain.
Example Applications:
- CHA MPAS 2.0: Mounting radials on a tripod or support structure enhances performance, especially in urban or high-elevation environments.
- CHA MCC: Performs better with an elevated counterpoise when used in a vertical configuration, minimizing ground losses.
- CHA BV: Greatly benefits from an elevated counterpoise setup, ensuring improved efficiency over poor-conductivity surfaces.
Single Counterpoise for Gain and Directionality
A single counterpoise can be used strategically to enhance gain and directivity, shaping the antenna’s radiation pattern. By extending a single radial or counterpoise in a particular direction, you can influence where the antenna radiates the strongest signal.
Benefits of a Single Counterpoise:
- Enhances Directional Gain – Focuses RF energy in a specific direction.
- Useful for DXing – Helps improve long-distance communication by directing the signal.
- Space-Saving Solution – Ideal for operators who lack the space for a full radial system.
Example Applications:
- CHA MPAS 2.0: Adding a single elevated counterpoise in a specific direction improves signal strength for DX contacts.
- CHA MCC: A single counterpoise can fine-tune the radiation pattern when used in a vertical setup.
- CHA BV: Using a single counterpoise can help focus the radiation pattern, increasing performance toward a specific target area.
Ground Planes and Their Role in Antenna Performance
A ground plane is a conductive surface that acts as a reference point for an antenna system. Ground planes are typically used with vertical antennas and can be either artificial (man-made) or natural (earth-based).
Types of Ground Planes:
Radial-Based Ground Plane
- A set of radials extending outward from the base of the antenna functions as a ground plane.
- More radials improve efficiency, with 8-16 being a common starting point.
- CHA MPAS 2.0 and CHA BV greatly benefit from radial-based ground planes.
Metallic Surface Ground Plane
- A metal roof, car roof, or other large conductive surface can act as a ground plane.
- Works well for mobile and rooftop-mounted antennas.
- CHA MPAS 2.0 can be mounted on a car roof for an effective mobile ground plane.
- Earth Ground Plane
- When installed directly on the soil, an antenna relies on the natural conductivity of the earth.
- Performance varies based on soil type; wet, mineral-rich soil works best.
- CHA BV benefits from being placed in a well-grounded location for better efficiency.
Choosing the Right Ground Plane:
- If space allows, a radial-based ground plane provides the best performance for vertical antennas.
- Metallic surfaces (like a roof or vehicle) are excellent alternatives for mobile or space-constrained setups.
- In poor ground conditions, elevated radials or counterpoise systems may outperform traditional ground planes.
Optimizing Your Ground System for Maximum Performance
Choosing between cut vs. uncut radials, elevated counterpoise, single counterpoise, or ground planes depends on your station setup and operating conditions:
- Cut Radials: Best for fixed stations needing maximum efficiency on a specific frequency.
- Uncut Radials: Best for multi-band and portable setups where frequency flexibility is needed.
- Elevated Counterpoise: Reduces ground losses and improves efficiency, especially in poor soil conditions.
- Single Counterpoise: Enhances gain and directionality, making it ideal for DXing.
- Ground Plane: Essential for efficient vertical antenna operation, whether using radials, metal surfaces, or direct earth grounding.
By understanding and implementing these grounding techniques, you can significantly enhance the performance of your CHA MPAS 2.0, CHA MCC, and CHA BV, ensuring efficient radiation, reduced losses, and improved signal reach. Whether you’re setting up a precision-tuned fixed station or a versatile portable antenna system, optimizing your antenna’s ground system is key to achieving superior results in amateur radio operations.
Understanding HF Antenna SWR: Why a 1:1 SWR Isn’t Necessary and How to Optimize Your Setup with Chameleon Antenna Products
One of the most persistent myths in amateur radio is the obsession with achieving a perfect 1:1 Standing Wave Ratio (SWR). Many operators mistakenly believe that a slightly elevated SWR is a problem and that they need to tune their system for a 1:1 match at the transceiver. However, in reality, an SWR of up to 1.7:1 is entirely acceptable and has minimal impact on actual performance.
The key to an efficient system is ensuring low SWR at the antenna feed point—not at the transceiver. Many operators rely on an antenna tuner at the radio to achieve a 1:1 match, but this only fools the transmitter into seeing a low SWR; it does not fix any efficiency losses in the antenna system.
Why a 1:1 SWR at the Transmitter Is Overrated
Here’s why chasing a 1:1 SWR at the transceiver is not the best approach:
- Minimal Power Loss at Slightly Higher SWR – An SWR of 1.7:1 results in negligible power loss (about 2%). Even at 2:1 SWR, only about 10% of power is lost, which is hardly noticeable in real-world operation.
- Antenna Efficiency Matters More – SWR alone does not determine antenna efficiency. For example, a dummy load has a perfect 1:1 SWR but radiates almost no signal. An antenna with 1.5:1 SWR but proper installation and good radiation efficiency will outperform an inefficient antenna with a 1:1 SWR.
- The Feedline Can Mask Real Issues – Many operators measure SWR at the transceiver, but a low SWR at the transmitter does not mean the antenna is properly tuned. SWR should be measured at the antenna feed point to ensure the antenna itself is resonant and efficient.
- Built-in Tuners Are Not a Fix-All Solution – Many modern transceivers have automatic tuners that bring SWR down to 1:1 at the radio, but this does not improve the efficiency of a poorly installed antenna. Instead, it only matches the impedance at the transmitter, while RF energy may still be lost as heat in the feedline.
- Mismatch Tolerance in Modern Transceivers – Most modern HF transceivers can tolerate SWR up to 2:1 before they begin reducing output power. Unless you're working with extremely weak signals or high-power setups, minor SWR variations are not a concern.
The Difference Between Base Station and Portable Installations
There is a significant difference between how SWR, efficiency, and setup considerations apply to base stations versus portable (POTA/SOTA) setups.
Base Station Installations
A base station setup typically allows for more permanent, optimized installations with better grounding, elevated antennas, and longer feedlines. Key considerations include:
- Antenna Height – Base antennas, such as the CHA TDL or CHA OCF40, should be elevated at least 20-30 feet for maximum efficiency.
- Grounding & Bonding – Proper grounding and bonding reduce RF interference and improve system performance.
- Low-Loss Coax – For base stations, LMR-400 or RG-213 is ideal for long feedlines to minimize losses.
- Antenna Matching at the Feed Point – Base antennas should have a low SWR at the feed point, not just at the transceiver. Using the CHA UNUN/BALUN with an end-fed wire ensures a proper match.
Portable Installations (POTA/SOTA/HOA-Friendly)
A portable setup requires different considerations due to temporary deployment, lower antenna height, and different operating conditions. Key factors include:
- Ease of Deployment – Portable antennas like the CHA MPAS 2.0 or CHA LEFS 4010 or 8010 need to be quick to deploy and require minimal tuning.
- Counterpoises & Radials – Portable vertical antennas benefit from ground radials or counterpoises to improve efficiency.
- Shorter Feedlines – Portable setups typically use RG-58 or RG-8X, which are more flexible but have higher losses over long runs.
- Obstructions & Environment – Portable setups often encounter trees, terrain variations, and metal structures that can affect SWR and efficiency.
How to Fix SWR Issues: 10 Key Considerations
Instead of chasing a perfect 1:1 SWR at the transmitter, focus on proper antenna installation and feed point efficiency. Here are 10 critical factors to optimize your antenna system:
- Measure SWR at the Feed Point, Not Just at the Transceiver
– Use an antenna analyzer at the antenna feed point to ensure proper matching and efficiency. - Choose the Right Feedline
– Use low-loss coaxial cable like LMR-400 or RG-213 for base stations and RG-58 for portable setups. - Use High-Quality Baluns and Ununs
– Many SWR issues arise from impedance mismatches. For example, using a CHA UNUN 49:1, 4:1, 5:1 or 9:1 ensures proper matching for end-fed wires. - Adjust Antenna Height
– Raising an antenna higher can significantly change its impedance and SWR. - Use a Current Choke to Prevent RF on the Coax
– RF feedback on the shield can cause high SWR. A common-mode choke like the CHA RFI CHOKE reduces unwanted currents. - Check for Nearby Metal Objects
– Keep antennas away from metal buildings, cars, or fences, which can detune them. - Use a Counterpoise for End-Fed Antennas
– Attaching a counterpoise or radial improves efficiency and lowers SWR. - Ensure Proper Grounding
– Base stations need good grounding to reduce noise and RF interference. - Weatherproof Coax Connections
– Water intrusion can change impedance and increase SWR. Use coax sealant or heat-shrink tubing to protect connections. - Inspect Cables and Connectors
– Damaged coax or loose connectors can cause high SWR. Regularly inspect and replace components as needed.
15 Additional Factors for HF Antenna Installation
To ensure the best performance, consider the following 15 detailed factors when installing an HF antenna:
- Choose an antenna that fits your operating style (portable vs. base).
- Ensure correct antenna orientation for DX or NVIS propagation.
- Adjust antenna height to optimize impedance and radiation pattern.
- Use quality insulators to prevent detuning from nearby objects.
- Avoid excessive coax lengths to minimize loss.
- Secure feedline to avoid sharp bends and kinks.
- Trim the radiating element to achieve better resonance.
- Select the right balun or unun for impedance transformation.
- Optimize portable setup grounding with radials or counterpoises.
- Match antenna to expected propagation conditions for best results.
- Secure portable antennas against wind and weather.
- Use radials for vertical antennas to maximize efficiency.
- Space multiple antennas at least 1/4 wavelength apart to prevent interaction.
- Use high-quality connectors to prevent signal degradation.
- Document your installation to track performance and adjustments.
Final Thoughts
Instead of obsessing over achieving a 1:1 SWR at the transmitter, focus on having low SWR at the antenna feed point and optimizing overall system efficiency. An SWR of 1.7:1 or lower is perfectly acceptable and will work just fine for most amateur radio applications.
By following these best practices and using reliable products from Chameleon Antenna, you’ll achieve better performance, less troubleshooting, and more enjoyable operating experiences—whether you’re at home, in the field, or working within HOA restrictions.
QRP Operations with Chameleon Antenna Products: A Guide for Operators
QRP (low-power) operations in amateur radio emphasize efficiency, skill, and strategic setup. Whether you're engaging in portable, emergency, or stealth operations, Chameleon Antenna offers a range of solutions designed for reliable QRP performance. This guide explores key factors for optimizing your QRP setup, including the right antenna selection, installation, and operating techniques.
Why QRP?
QRP operations typically use power levels of 5W CW or 10W SSB. The focus is on making contacts over long distances using skillful operating techniques and efficient antenna systems. With the right antenna, propagation knowledge, and patience, QRP can be just as effective as high-power operations.
15 Key Considerations for Installing a QRP Antenna System
1. Choosing the Right Antenna
- The antenna is the most critical component of any QRP setup. Efficient designs like end-fed half-wave (EFHW), magnetic loops, verticals, and dipoles are ideal for low-power operations.
- Chameleon Antenna products such as the CHA MPAS 2.0, CHA F-LOOP 3.0, and CHA EMCOMM II offer versatile QRP solutions for portable and fixed stations.
2. Antenna Height and Placement
- The height of an antenna significantly impacts its performance. Raising an EFHW or dipole antenna to at least 25-30 feet improves efficiency.
- If using a vertical like the CHA MPAS 2.0, placing it over a conductive surface (e.g., wet ground, a metal roof, or a car body) enhances radiation efficiency.
3. Grounding and Counterpoise
- A good counterpoise or radial system improves efficiency in QRP operations.
- CHA MPAS 2.0 and CHA HYBRID-MINI work best when radials or counterpoise wires are deployed for lower losses.
4. Matching Impedance and SWR
- Using a proper impedance-matching network ensures minimal signal loss.
- The CHA HYBRID-MINI and CHA HYBRID-MICRO include built-in impedance transformers to optimize antenna matching.
5. Portable vs. Fixed Installations
- Portable QRP setups require compact, easy-to-deploy antennas. The CHA F-LOOP 3.0 offers a compact magnetic loop option for backpacking or stealth operations.
- Fixed QRP stations can utilize an end-fed wire (CHA EMCOMM II or CHA EMCOMM III Base) or Windom antenna for multi-band use.
6. Feedline Considerations
- High-loss coaxial cable degrades QRP signals. Use RG-8X, LMR-240, or LMR-400 for the best efficiency, especially on HF bands.
- For minimal losses in portable QRP setups, keep coax length short.
7. Magnetic Loop Antennas for QRP
- Magnetic loops like the CHA F-LOOP 3.0 are highly efficient for QRP, especially in HOA-restricted or apartment settings.
- Their high Q factor results in superior signal efficiency compared to short verticals or inefficient long wires.
8. Noise Reduction
- Using a common-mode choke or ferrite beads on the feedline minimizes RFI and noise pickup.
- Magnetic loops (CHA F-LOOP 3.0) naturally reduce local QRM due to their unique radiation pattern.
9. Power Efficiency
- Efficient radios with low current draw, such as the ICOM IC-705, Elecraft KX2/KX3, or Yaesu FT-818, complement QRP setups.
- Running on LiFePO4 batteries ensures a longer operating time in the field.
10. Propagation and Band Conditions
- HF propagation varies by time of day and solar cycle. QRP success depends on operating on the right band at the right time.
- 20M and 40M are the best all-purpose QRP bands, while 10M and 15M can yield excellent DX contacts during high solar activity.
11. Operating Modes for QRP
- CW and digital modes (FT8, JS8Call, PSK31) offer the best performance in low-power situations.
- Voice modes work, but SSB requires careful operating and efficient antennas to make long-distance contacts.
12. Logging and Spotting
- Using DX clusters, Reverse Beacon Network (RBN), and POTA/SOTA spotting websites helps identify active stations and increases QRP success.
- Portable operators benefit from logging apps like HAMRS or N3FJP's software.
13. Portable Deployment Tips
- A lightweight mast (CHA Portable Mast or a telescopic pole) helps elevate antennas in the field.
- Setting up near water or elevated locations enhances radio wave propagation.
14. Weatherproofing and Durability
- Chameleon Antennas are built for rugged use, but ensuring connectors and coax junctions are sealed prevents signal degradation from moisture.
- The CHA MPAS 2.0 and CHA F-LOOP 3.0 are designed for field deployment in extreme conditions.
15. Testing and Adjustments
- Use an antenna analyzer (CHA SA-1, RigExpert, NanoVNA, or MFJ-259C) to fine-tune your QRP antenna system.
- Regularly test and adjust the system based on band conditions and operating environment.
Conclusion
QRP operations require careful planning, efficient antenna selection, and proper installation. Chameleon Antenna products offer versatility, durability, and high efficiency, making them excellent choices for low-power enthusiasts. Whether you're in the field, at home, or working stealth in an HOA, implementing these 15 considerations will maximize your QRP success.
Installing a Proper HOA-Friendly Antenna: A Comprehensive Guide
For amateur radio operators living in Homeowners Association (HOA) communities, installing a proper antenna while remaining within HOA regulations can be a challenge. Many HOAs have strict rules prohibiting visible outdoor antennas, requiring operators to find creative, effective, and often stealthy solutions. In this guide, we will cover 15 important points to successfully install an HOA-friendly antenna and provide an in-depth comparison of Chameleon Antenna options.
15 Key Points for Installing an HOA-Friendly Antenna
- Check HOA Rules and Local Regulations
- Choose a Stealthy Installation Location
- Use Camouflage Techniques
- Optimize for HF or VHF/UHF Bands
- Leverage Existing Structures
- Use Magnetic Loop Antennas for Indoors
- Select the Right Coaxial Cable
- Incorporate a Good Grounding System
- Employ RF Chokes and Baluns
- Experiment with Attic Installations
- Many attic spaces can accommodate wire antennas or loops.
- Be mindful of metal roofing, which can degrade performance.
Utilize HOA-Approved Mounts and Masts
- If allowed, use telescoping masts or mounts that can be retracted when not in use.
- Temporary mounts such as the CHA SPIKE MOUNT offer quick deployment and removal.
Consider Portable and Temporary Antennas
- Deploy portable antennas for temporary use, such as the CHA MPAS 2.0.
- Set up antennas only when in use and take them down afterward.
Test Different Configurations
- Adjust height, orientation, and position for optimal performance.
- Utilize antenna analyzers to fine-tune resonance.
Use HOA-Friendly Accessories
- Opt for slim coaxial runs, inconspicuous wire, and stealth radials.
- Choose equipment that blends seamlessly with surroundings.
Be Prepared to Negotiate with the HOA
- Provide data on low-profile antennas to gain approval.
- Show evidence of FCC rules protecting amateur radio operators in certain cases.
Chameleon Antenna Options for HOA-Friendly Installations
1. CHA OCF40 (Off-Center Fed Dipole)
- Covers multiple bands without requiring a tuner.
- Can be installed stealthily in an attic or along a fence for reduced visibility.
- Lightweight and easy to deploy, making it a great choice for limited spaces.
2. CHA LEFS 4010 (Lightweight End-Fed Antenna)
- Highly portable and ideal for stealthy installations in restricted areas.
- Works efficiently when mounted in attics, balconies, or hidden along structures.
- Provides good multi-band coverage with the use of a tuner.
3. CHA TDL (Tactical Delta Loop)
- Excellent performance due to its loop design, enhancing signal reception and transmission.
- Can be outdoors with a low-profile appearance.
- Well-suited for NVIS (Near-Vertical Incidence Skywave) operations, making it ideal for emergency communication.
4. CHA EMCOMM II (Emergency Communications Antenna)
- Versatile and easy to install, offering rapid deployment when needed.
- Can be placed in attics, strung along fences, or camouflaged within landscaping.
- Designed for reliable emergency HF communications with broad coverage.
5. CHA MPAS 2.0 (Modular Portable Antenna System)
- Modular design allows for adaptability in multiple environments, making it ideal for HOA-restricted areas.
- Quickly deployable and removable, allowing temporary setups without violating HOA rules.
- Supports multiple configurations, ensuring efficient communication across various frequencies.
6. CHA TACYAGI-70 (Tactical Yagi Antenna for 70cm Band)
- High-gain directional antenna designed for enhanced UHF performance.
- Compact and easy to store when not in use, making it a flexible option.
- Can be mounted on temporary or permanent structures for targeted communications.
7. CHA BV (Broadband Vertical)
- Covers multiple bands without requiring a tuner, reducing setup complexity.
- Compact size and small footprint make it an excellent choice for HOA-restricted environments.
- Designed for both DX and local communication with strong signal efficiency.
8. CHA MCC (Mobile Coil Conversion Kit)
- Ideal for mobile and portable HF operations with a flexible design.
- Easy to set up and remove, making it perfect for temporary use in restricted locations.
- Can be used with various configurations to optimize performance for different bands.
Conclusion
Installing an HOA-friendly antenna requires careful planning, creativity, and technical expertise. By understanding HOA restrictions, selecting the right antenna, and optimizing installation techniques, amateur radio operators can enjoy effective communication while staying within HOA guidelines. Chameleon Antenna provides a variety of solutions tailored to different HOA environments, allowing operators to find the best fit for their needs.
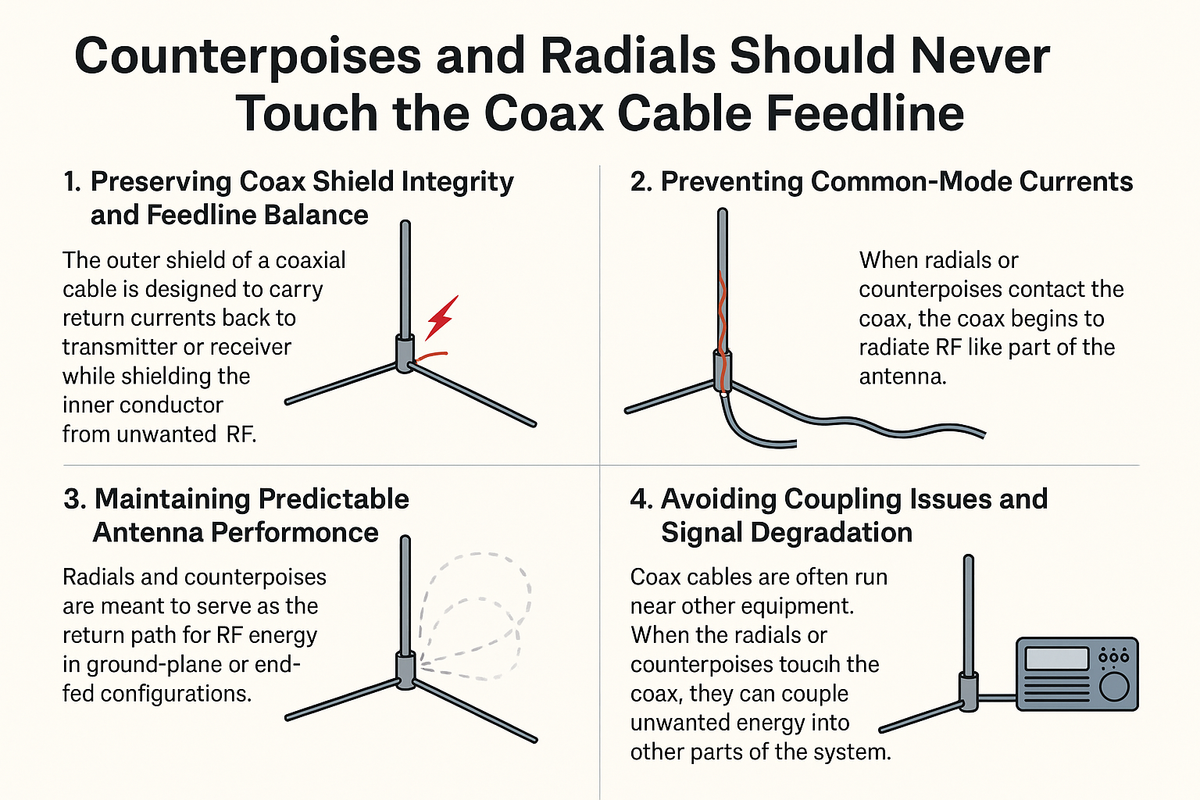
How to Install a Proper Feed Line for Maximum Antenna Efficiency
Proper feed line installation is critical for reducing signal loss, preventing radio frequency interference (RFI), and ensuring optimal performance of your antenna system. Whether you’re setting up for portable operation, a base station, or an HOA-restricted environment, following best practices will help you achieve the best signal quality.
Understanding Feed Lines and Their Importance
The feed line (coaxial cable) is the bridge between your radio and your antenna. A poorly chosen or improperly installed feed line can lead to:
- High signal loss (attenuation)
- Interference and noise pickup
- RF hot spots and common mode current issues
- Decreased transmitted and received signal strength
Recommended Coaxial Cables for Various Applications
- CHA COAX CABLE with RFI choke – Best for reducing RFI and common mode current. Ideal for both base stations and HOA operations.
- CHA RG-316 – A lightweight, flexible, and high-frequency coax suitable for portable operations and low-power setups.
Feed Line Installation for Different Setups
1. Portable Operation
Portable operation, such as POTA (Parks on the Air) and SOTA (Summits on the Air), requires lightweight and efficient setups that are easy to deploy and take down.
Best Practices for Portable Operation
- Use lightweight coax: CHA RG-316 is a great choice due to its flexibility.
- Keep the cable length short: Long coax runs increase signal loss. Keep it under 25 feet if possible.
- Use an RFI choke: Even in the field, an RFI choke (like the one on CHA COAX CABLE) helps prevent unwanted RF issues.
- Use quality connectors: Avoid cheap connectors that can introduce loss or fail in outdoor conditions.
- Soil type and condition matter: Wet, rocky, or highly conductive soil can affect the efficiency of your coaxial cable, potentially leading to unwanted detuning or increased RF coupling.
- Coax on snow and ice: Unlike regular soil, snow and ice can alter the impedance of the coaxial cable, cause moisture ingress into poorly sealed connectors, and even attenuate RF signals due to increased dielectric losses. If operating in snowy conditions, ensure that:
- Avoid looping the coax on itself: Coax loops can create unwanted inductance and interfere with proper signal transmission.
2. Base Station Setup
For permanent base stations, where longer coaxial cable runs are needed, signal loss and interference become major concerns.
Best Practices for Base Stations
- Use high-quality coaxial cable: CHA COAX CABLE with RFI choke is ideal for minimizing RF issues.
- Proper grounding: Install a grounding rod and connect it to your feed line shield.
- Install an RFI choke: A ferrite core RFI choke (such as the one included in CHA COAX CABLE) should be placed at the antenna feed point and at the radio to prevent RFI.
- Keep coax away from power lines and other cables: Avoid running coax parallel to AC lines to minimize interference.
- Use waterproof connectors: Crimped connectors with heat shrink will prevent moisture ingress, extending the lifespan of the feed line.
- Lightning protection: Install a coaxial lightning arrestor in line with your feed line.
- Do not use an "UGLY COAX CHOKE": This type of choke, made by wrapping coax into a coil, often fails to effectively block common mode current and can create unnecessary inductance. Instead, use a properly designed RFI choke, like the CHA RFI choke, which utilizes ferrite material to absorb and dissipate unwanted RF energy.
3. HOA-Friendly Installations
In HOA-restricted areas, stealth is key. Many operators use attic installations, disguised antennas, or short verticals.
Best Practices for HOA Installations
- Use thin, flexible coax: CHA RG-316 works well for tight spaces like attics.
- RFI chokes are essential: Indoor setups can pick up RFI easily, so use CHA COAX CABLE with an integrated RFI choke.
- Use high-quality shielding: Double-shielded coax helps prevent unwanted noise from nearby electronics.
- Minimize cable runs: Since space is limited, keeping your coax as short as possible reduces signal loss.
- Proper routing: Avoid running coax near HVAC ducts, electrical wiring, and fluorescent lighting.
Troubleshooting Common Feed Line Issues
Even with proper installation, issues can arise. Here’s how to troubleshoot common problems:
- High SWR
- RF Feedback
- High signal loss
- Noise or interference
- Weak receive signal
Conclusion
A properly installed feed line is critical for maximizing the efficiency of your antenna system. Whether you're operating portable, running a base station, or setting up stealthily in an HOA, following these best practices will help you minimize loss, reduce interference, and get the most out of your setup.
- Portable operators should use lightweight coax and keep runs short.
- Base station setups require proper RFI chokes, good grounding, and lightning protection.
- HOA installations need thin, flexible, and well-routed coax with RFI mitigation.
By following these installation techniques and using high-quality feed lines like CHA COAX CABLE with RFI choke and CHA RG-316, you’ll ensure better efficiency, lower noise, and stronger signals in all your operations.
Broadband vs. Multiband vs. Resonant Antennas: Choosing the Right One for Your Needs
Selecting the right HF antenna is crucial for amateur radio, emergency communications (EMCOMM), and portable operations. One of the key decisions is whether to use a broadband, multiband, or resonant antenna. Each type has distinct advantages and trade-offs, making them more suitable for specific applications.
In this guide, we’ll break down the differences between these antenna types, using Chameleon Antenna products as real-world examples to highlight their strengths, weaknesses, and ideal use cases.
Broadband Antennas: Pros and Cons
Broadband antennas are designed to operate across a wide frequency range with minimal or no tuning. They are ideal for rapid deployment scenarios, including emergency communications, military applications, and field operations where quick setup is essential. However, some broadband antennas may still require a tuner to optimize performance, especially on certain bands.
Chameleon Broadband Antennas
- CHA EMCOMM II – A portable, end-fed broadband antenna designed for rapid EMCOMM deployment.
- CHA TDL – A Tactical Delta Loop antenna that provides broadband coverage in a compact, self-supporting design.
- CHA MPAS 2.0 – A modular, portable antenna system with broadband capabilities for field use.
Pros of Broadband Antennas
- Covers multiple frequencies without needing extensive adjustments.
- Quick and easy deployment, ideal for emergency or tactical operations.
- Consistent performance over a broad frequency range.
- Versatile for base stations, portable operations, and vehicle-mounted setups.
Cons of Broadband Antennas
- Lower efficiency compared to resonant antennas due to resistive loading and matching networks.
- Increased noise pickup since they are not selective to specific frequencies.
- Some broadband antennas still require a tuner for better SWR and efficiency on certain frequencies.
- Requires external counterpoises or grounding for optimal performance in some configurations.
Best Use Cases for Broadband Antennas
- Emergency communications (EMCOMM) where rapid setup and frequency agility are critical.
- Military and government applications needing access to multiple bands.
- Portable field operations requiring frequency flexibility with minimal tuning.
Multiband Antennas: Pros and Cons
Multiband antennas are designed to resonate on multiple specific frequencies, offering higher efficiency and better performance than broadband antennas. However, they often require manual tuning, traps, or loading coils to function effectively.
Chameleon Multiband Antennas
- CHA BV – A compact vertical antenna designed for portable operations and HOA-restricted environments.
- CHA MCC – A modular coil antenna allowing users to switch between different bands.
Pros of Multiband Antennas
- Higher efficiency with better performance on specific bands.
- More selective, reducing noise and unwanted interference.
- Compact and lightweight options available for portable and HOA use.
- Lower SWR on designated bands, improving transmission efficiency.
Cons of Multiband Antennas
- Requires tuning or manual adjustments on some bands.
- Limited to specific bands, unlike broadband antennas.
- More complex setup with traps, loading coils, or counterpoises.
Best Use Cases for Multiband Antennas
- Portable operations where efficiency and selectivity are crucial.
- HOA-restricted environments where stealth and compactness matter.
- Parks on the Air (POTA) and Summits on the Air (SOTA) where lightweight, efficient antennas are needed.
- DXing and contesting where maximum efficiency is required for long-distance communication.
Resonant Antennas: Pros and Cons
Resonant antennas are designed to operate at a specific frequency (or harmonics) without requiring an external tuner. They offer the highest efficiency and best overall performance but lack the frequency agility of broadband or multiband antennas.
Chameleon Resonant Antennas
- CHA LEFS 8010 – A full-length, efficient end-fed half-wave antenna for 80m to 10m.
- CHA LEFS 4010 – A shorter, high-efficiency version covering 40m to 10m.
- CHA OCF40 – An off-center-fed dipole providing strong performance on primary HF bands.
Pros of Resonant Antennas
- Highest efficiency, minimizing signal loss.
- No tuner required for operation on designated bands.
- Improved signal-to-noise ratio, offering cleaner reception.
- Lower SWR, ensuring better power transfer and transmission efficiency.
Cons of Resonant Antennas
- Limited frequency range, requiring multiple antennas for full-band coverage.
- Requires precise length adjustments or traps for multi-band use.
Best Use Cases for Resonant Antennas
- Permanent or semi-permanent installations where efficiency is the top priority.
- DXing and contesting where strong signal performance is essential.
- Fixed-base stations needing reliable, high-efficiency operation.
Which Antenna Should You Choose?
Choose a Broadband Antenna If:
- You need a rapid deployment antenna for emergency or tactical use.
- You want an all-in-one solution with minimal tuning.
- You operate in environments where frequency agility is more important than efficiency.
Choose a Multiband Antenna If:
- You want maximum efficiency on specific bands with the flexibility of multiple frequencies.
- You are okay with using a tuner or manually adjusting your antenna.
- You need a compact, portable, or HOA-friendly solution.
Choose a Resonant Antenna If:
- You want the highest efficiency possible with minimal signal loss.
- You operate primarily on one or two bands and prefer not to use a tuner.
- You are setting up a home station, contesting station, or long-term installation.
Conclusion
Broadband, multiband, and resonant antennas each serve unique roles in radio communications.
- Broadband antennas like the CHA EMCOMM II or CHA MPAS 2.0 provide quick setup and frequency agility but may require a tuner in some situations.
- Multiband antennas like the CHA BV or CHA MCC balance efficiency and flexibility, offering strong performance for portable and HOA use.
- Resonant antennas like the CHA LEFS 4010 or CHA OCF40 provide the highest efficiency and best signal quality but are limited to specific frequencies.
Understanding these trade-offs will help you choose the best antenna for your operating style and needs. Whether you are preparing for emergency response, portable expeditions, or a permanent base station, Chameleon Antenna offers high-quality solutions for all three categories.
Understanding HF Propagation Charts, MUF, and How to Master HF Communications
Introduction
High-frequency (HF) radio propagation is influenced by many factors, including solar activity, ionospheric conditions, time of day, and seasonal variations. Understanding these factors is critical for any operator who wants to master HF communications—whether for portable operations, emergency communications (EMCOMM), or general amateur radio use. This guide will help you interpret propagation charts, understand Maximum Usable Frequency (MUF), and utilize online tools to predict and optimize your HF operations.
1. Fundamentals of HF Propagation
HF radio waves (3–30 MHz) primarily propagate via skywave reflection off the Earth’s ionosphere, making long-distance (DX) communication possible. The key ionospheric layers involved are:
- D-layer (50-90 km altitude): Absorbs low-frequency HF signals, mainly active during the day, causing higher absorption on 80m and 160m.
- E-layer (90-150 km altitude): Temporary reflection layer that aids in sporadic-E (Es) propagation, affecting 10m to 6m bands.
- F-layer (150-400 km altitude): The primary layer for long-distance HF propagation, splitting into F1 and F2 during the day. The F2 layer is responsible for global DX propagation.
2. Understanding Maximum Usable Frequency (MUF)
The Maximum Usable Frequency (MUF) is the highest frequency at which radio waves can be refracted by the ionosphere back to Earth over a given path. Several key propagation concepts include:
- MUF (f0F2): The frequency that allows reliable ionospheric reflection.
- Critical Frequency (f0F2): The highest frequency that can be reflected at a vertical incidence.
- Lowest Usable Frequency (LUF): The lowest frequency that can effectively propagate due to ionospheric absorption and noise levels.
- Optimum Working Frequency (OWF): Typically 85% of the MUF for best reliability.
Online tools like VOACAP (Voice of America Coverage Analysis Program) and PropK help calculate MUF values based on real-time data.
3. How to Read HF Propagation Charts
Propagation charts visually represent expected band conditions, helping operators determine the best frequencies for communication. Common elements in these charts include:
- Time of day (UTC) vs. Frequency (MHz) graphs
- Solar indices such as SFI (Solar Flux Index), Kp Index (Geomagnetic Stability), and A-index
- Predicted MUF and LUF for specific paths
- Regional propagation conditions (short-path vs. long-path predictions)
Popular sources for HF propagation charts:
- VOACAP Online – Interactive propagation predictions
- DXHeat Propagation – Live band conditions
- SolarHam – Space weather and solar activity
- PSKReporter – Real-time propagation data from digital mode reports
4. Interpreting Solar Indices and Their Effect on HF
Key Solar Parameters Affecting HF Propagation:
- Solar Flux Index (SFI): Higher values (>100) improve HF propagation.
- Kp Index: Measures geomagnetic storm activity; values below 3 indicate stable conditions.
- A Index: Averages Kp over 24 hours; lower values are better for HF propagation.
- X-ray and proton flux levels: Affect D-layer absorption, influencing daytime HF conditions.
For up-to-date space weather data:
5. Best HF Bands for Day, Night, and Seasonal Use
Daytime Bands (Best between sunrise and sunset):
- 10m (28 MHz), 12m (24 MHz), 15m (21 MHz), 17m (18 MHz), 20m (14 MHz)
Nighttime Bands (Best between sunset and sunrise):
- 160m (1.8 MHz), 80m (3.5 MHz), 60m (5 MHz), 40m (7 MHz)
Seasonal Considerations:
- Winter:
Lower bands (160m, 80m, and 40m) experience less noise from thunderstorms, making them more effective.
Higher bands (20m, 17m, 15m) may still work during the day but are less reliable.
- Summer:
Higher noise levels on lower bands due to thunderstorms.
Sporadic-E (Es) propagation enhances 6m and 10m bands, offering short-skip communication opportunities.
- Spring/Fall:
Best overall HF propagation conditions due to balanced ionospheric activity.
DX conditions are optimal on mid-range bands (20m, 17m, and 15m).
6. Practical Application for Portable & EMCOMM Operators
Portable Operations:
- Use MUF predictions to select the best bands for field deployment.
- Carry a multi-band antenna like an end-fed or dipole to adapt to band conditions.
- Monitor real-time propagation using apps like DX Cluster (DXHeat).
Emergency Communications (EMCOMM):
- Opt for NVIS (Near Vertical Incidence Skywave) for regional coverage on 40m-80m.
- Be aware of MUF and LUF fluctuations during emergencies.
- Keep an alternative antenna setup to adjust for band shifts.
For EMCOMM propagation tools:
7. Advanced HF Tools and Resources
To become an HF expert, leverage these tools:
- VOACAP Online – https://www.voacap.com
- HF Propagation Predictions – https://www.dxmaps.com
- Real-time MUF Monitoring – https://prop.kc2g.com/
- PSK Reporter for Digital Mode Operators – https://www.pskreporter.info/pskmap.html
Conclusion
Mastering HF propagation requires understanding MUF, LUF, solar indices, and real-time charts. By using online resources, monitoring space weather, and practicing adaptive frequency selection, operators can maximize their HF communication efficiency—whether for portable operations, emergency preparedness, or general DXing.
Bookmark the links in this guide and integrate these tools into your operating routine. The more you understand propagation, the more effective you’ll be at making reliable HF contacts across any condition!
What is MPAS READY?
What is MPAS READY?
The MPAS READY (Modular Portable Antenna System) from Chameleon Antenna™ is a highly versatile, modular, and adaptable antenna system designed to meet the needs of amateur radio operators, emergency communication teams (EMCOMM), military personnel, and outdoor radio enthusiasts. It is built with a building block approach, allowing operators to customize their antenna configuration based on operating environment, propagation conditions, and mission objectives.
Key Features of MPAS READY
- Modular & Customizable – Operators can tailor their setup by selecting from a range of mounts, bases, radiators, and counterpoises.
- Multi-Band Coverage – Supports HF frequencies from 160M–6M, making it suitable for short- and long-range communication.
- Broadband & Resonant Options – Offers broadband configurations that require minimal tuning, as well as resonant single-band setups for optimized efficiency.
- Portable & Durable – Designed for field operations, it is compact, lightweight, and built to withstand harsh environments.
- Stealth & Tactical Use – Can be deployed in urban and field environments with minimal visibility.
- Upgrade-Friendly – Users can incrementally expand their MPAS system with additional components instead of replacing entire systems.
How MPAS READY Works
MPAS READY is assembled using a simple four-step process:
- Choose a Mount – Options include ground spikes, tripods, and clamp mounts.
- Select a Base – Three base types are available:
- Pick a Radiator – Choices include whip antennas (SS17, SS25, MIL WHIP) or wire elements.
- Add a Counterpoise – Improve efficiency with radial systems or counterpoise wires.
This modular structure allows operators to configure their MPAS READY antenna for optimal performance in various operating conditions.
Configurations Available in MPAS READY
MPAS READY antennas can be set up in different configurations, depending on user needs:
1. MCC-Based Configurations
- Utilize the Multi-Configuration Coil (MCC) for adjustable multi-band performance.
- Examples: CHA PRV (Portable Resonant Vertical), CHA PRV (MIL) for military applications.
2. BV-Based Configurations
- Use the Blank Adapter (BV) to create a resonant, single-band antenna system.
- Examples: CHA BV (Basic Vertical), CHA BV (LZ Sloper) for NVIS and emergency communications.
3. Hybrid Mini/Micro-Based Configurations
- Broadband configurations that require minimal tuning.
- Examples: CHA MPAS Lite, CHA MPAS 2.0, CHA TDL (Tactical Delta Loop).
Why MPAS READY?
MPAS READY is designed for:
- Amateur radio enthusiasts looking for high-performance, portable antennas.
- Emergency responders (EMCOMM) needing reliable communication systems in disaster scenarios.
- Military & tactical operators requiring stealthy and mission-ready solutions.
- SOTA/POTA operators who need a quick-deploy, all-band HF antenna.
With MPAS READY, operators can confidently deploy and adapt their antenna system based on mission-critical needs. Whether for field deployments, off-grid operations, or emergency scenarios, MPAS READY delivers unmatched versatility, durability, and efficiency.
Want to Be the Best POTA/SOTA Operator? Here’s How!
Alright, POTA & SOTA warriors—let’s talk about what separates the good operators from the great ones. If you want to be the #1 operator, make more contacts, and earn those sweet activations, you need the right skills, the right mindset, and the right gear. Here’s what it takes to dominate the airwaves and make your activations legendary.
1. Master the Art of Activation
Being the best isn’t just about showing up—it’s about setting up fast, smart, and efficient. The pros don’t waste time fumbling around with gear. They:
- Scout locations ahead of time using tools like Google Earth, Gaia GPS, or SOTAmaps. Know the terrain, elevation, and potential obstacles before you go.
- Check access and permits. Some POTA locations require day-use fees or special permits. Always check in advance to avoid surprises.
- Study the activation zone. For SOTA, you must be within the designated zone of the summit. Knowing the exact coordinates and legal areas to operate from is critical.
- Plan multiple antenna setups. Conditions change, so have a backup plan for different band openings.
2. Essential Tools for Success
Great activators don’t just bring a radio and hope for the best—they use technology and planning to maximize their success.
Logging Apps (for quick and efficient logging in the field)
- HAMRS: The gold standard for POTA and SOTA logs. Simple, offline-capable, and integrates with spotting networks.
- VK Portalog: A top choice for Android users, optimized for fast logging.
- Fast Log Entry (FLE): Great for operators who prefer post-activation logging on a PC.
Propagation & Band Condition Tools (know when and where to operate)
- VOACAP: Free propagation predictor to help determine the best band for your activation.
- DX Heat & PSKReporter: Track real-time band conditions and QSO patterns.
- Solar Data Widgets: Apps like HF Propagation, Space Weather Live, or HamClock keep you updated on solar flux, geomagnetic storms, and MUF (Maximum Usable Frequency).
Spotting Networks (get found faster and work more contacts)
- POTA Spot: Real-time POTA activator and chaser alerts.
- SOTAwatch: The go-to site for SOTA spots, alerts, and recent activations.
- Reverse Beacon Network (RBN): Automated CW spotting—crucial for QRP and weak-signal operators.
Antenna Tuning & Performance Tools
- NanoVNA: A pocket-sized, budget-friendly antenna analyzer for checking SWR and resonance.
- RigExpert AA-35/AA-55: More robust than a NanoVNA, these analyzers provide a quick and accurate way to test your antenna system.
- SWR Meters: If your radio doesn’t have a built-in SWR meter, a dedicated unit ensures your antenna is working at peak efficiency.
Navigation & Location Tools
- Gaia GPS: Premium GPS mapping with topo maps, satellite views, and offline capabilities.
- Google Earth Pro: Helps visualize elevation and terrain before you travel.
- SOTAmaps: Crucial for summit activations, showing precise activation zones and access routes.
- What3Words: A great backup for pinpointing locations, especially in remote areas.
3. Equipment That Gives You the Edge
A great operator is only as good as their gear. Here’s what makes the difference in field operations.
Radios for POTA/SOTA
- QRP (Low Power) Options:
- 100W Options:
Antenna Choices
- End-Fed Half-Wave (EFHW): A top choice for quick deployment, no tuner needed, works well on multiple bands.
- Linked Dipoles: Adjustable for multiple bands, efficient, and lightweight.
- Verticals with Radials: Great for DX, works well in limited spaces, performs better with tuned radials.
- Magnetic Loops: Excellent for ultra-portable ops with limited space.
- Random Wire with a Tuner: Versatile and works at almost any site but requires a good tuner.
Power & Battery Management
- LiFePO4 Batteries: Light, reliable, and long-lasting. Bioenno, Talentcell, and Dakota Lithium are great options.
- Solar Panels: If operating for extended periods, a 20W–50W solar panel keeps you on the air longer.
- Power Distribution: Anderson Powerpole connectors and a small power distribution hub make your setup more reliable and efficient.
Portable Mast & Mounting Options
- Collapsible Carbon Fiber Masts: Great for SOTA due to their lightweight design.
- Fiberglass Masts: Durable and flexible, commonly used for wire antennas.
- Tripods & Spike Mounts: Essential for verticals and quickly setting up in uneven terrain.
4. Operator Skills that Set You Apart
Even with the best gear, operator skill is what truly makes a difference.
- Master CW & Digital Modes:
- Voice Operating Tips:
- Pileup Management:
- Emergency Preparedness:
5. The Winning Mindset
- Preparation is everything. The best activators research, plan, and adapt.
- Efficiency beats power. A well-placed 10W signal will outperform 100W with a bad setup.
- Resilience wins. Band conditions change, equipment fails—top operators push through and still succeed.
- Help others. The best operators don’t just make QSOs; they build the community by mentoring, sharing knowledge, and encouraging new activators.
Are you ready to step up your POTA/SOTA game? The difference between a good activation and a legendary one is how well you prepare, operate, and adapt. If you want to be the best, start implementing these tips and watch your activations soar.
Comprehensive Amateur Radio Terminology and Definitions
A
- A-Index: A measure of geomagnetic activity derived from the past 24 hours' K-index values, indicating radio wave propagation conditions.
- Absorption: The loss of radio signal strength as it passes through the ionosphere or atmospheric layers.
- AC (Alternating Current): Electrical current that periodically reverses direction, commonly used in household power supplies.
- Active Antenna: An antenna that includes an integrated amplifier to improve weak signal reception.
- AFC (Automatic Frequency Control): A circuit that maintains the receiver on a specific frequency by adjusting for drift.
- AGC (Automatic Gain Control): A receiver circuit that regulates gain to maintain a consistent output level despite varying signal strength.
- Airtime: The duration for which a radio station is transmitting.
- All-Mode Transceiver: A transceiver capable of operating in multiple modes, such as AM, FM, SSB, and CW.
- AM (Amplitude Modulation): A type of modulation in which the amplitude of the carrier wave varies based on the information signal.
- Amateur Radio Bands: Frequency ranges allocated by the International Telecommunication Union (ITU) for amateur radio use.
- Amateur Radio Emergency Service (ARES): A network of licensed amateur radio operators who provide emergency communication during disasters.
- Amplifier (Amp): A device that increases the power of an RF signal, often used to extend communication range.
- Antenna (ANT): A structure that radiates or receives electromagnetic waves.
- Antenna Array: A group of antennas working together to increase gain and directivity.
- Antenna Farm: A site containing multiple antennas used for various communications.
- Antenna Tuner (ATU): A device used to match the impedance of an antenna to the transmitter for optimal efficiency.
- APRS (Automatic Packet Reporting System): A digital communication system used for real-time tracking and messaging over amateur radio frequencies.
- Attenuator: A circuit or device that reduces signal strength without distorting the waveform.
- Audio Frequency (AF): Frequencies within the range of human hearing, typically between 20 Hz and 20 kHz.
B
- Backscatter: A propagation phenomenon where signals are reflected back toward the source by the ionosphere.
- Balun (Balanced to Unbalanced Transformer): A device that converts a balanced transmission line (such as a dipole antenna) to an unbalanced one (such as coaxial cable).
- Band: A specific range of radio frequencies allocated for particular services, such as amateur radio.
- Bandwidth: The range of frequencies that a signal occupies, measured in Hertz (Hz).
- Bandpass Filter: A filter that allows only a specific range of frequencies to pass while attenuating others.
- Base Station: A fixed amateur radio station, typically with a larger power supply and external antennas.
- Beacon: A transmitter that continuously sends signals to study radio wave propagation conditions.
- Beam Antenna: A directional antenna that focuses radio energy in a specific direction to improve signal strength.
- Birdies: Unwanted spurious signals generated within a receiver.
- BNC Connector: A type of quick-connect RF connector commonly used for coaxial cable connections in radio equipment.
- Bootlegger: An unlicensed individual transmitting on amateur radio frequencies.
- Break-In Operation: A method in CW communication where the operator can receive signals while still keying the transmitter.
- Broadcast: A transmission intended for reception by the general public rather than specific stations.
- Buffer Amplifier: An amplifier that isolates different circuit stages to prevent interactions.
- Burst Transmission: A rapid transmission of data in a short time to reduce exposure to interference or jamming.
C
- Call Sign: A unique identifier assigned to a licensed amateur radio operator by regulatory authorities.
- Carrier Wave: A radio wave that can be modulated with voice, data, or other information.
- CAT (Computer-Aided Transceiver): A system that allows computer control of radio equipment for frequency tuning and mode selection.
- Choke Balun: A type of balun that reduces common-mode current on coaxial feedlines.
- Coaxial Cable (Coax): A shielded cable used to connect antennas to transceivers while minimizing signal loss.
- Cold Solder Joint: A poor electrical connection in a soldered circuit due to inadequate heat application.
- Contesting: Competitive amateur radio events where operators attempt to make as many contacts as possible within a set timeframe.
- CQ Call: A general call inviting any station to respond.
- Crystal Filter: A highly selective filter used in receivers to narrow bandwidth and reduce interference.
- CW (Continuous Wave): A mode of transmission using Morse code without modulation.
D
- dB (Decibel): A logarithmic unit used to measure signal strength, gain, and loss in radio communication.
- D-STAR (Digital Smart Technologies for Amateur Radio): A digital voice and data communication protocol developed for amateur radio use.
- Damping: The reduction of oscillations in a circuit or antenna system.
- Data Mode: A transmission mode that conveys digital data, such as FT8, PSK31, RTTY, and JT65.
- DCS (Digital-Coded Squelch): A method of controlling access to a repeater by using sub-audible digital tones.
- Dead Key: A carrier signal transmitted without modulation.
- Decoding: The process of converting received digital or coded signals into understandable audio or text.
- Delta Loop Antenna: A full-wavelength, triangular-shaped loop antenna used for HF and VHF bands.
- Deviation: The extent of frequency shift in frequency modulation (FM) transmission.
- Diplexer: A device that allows multiple transmitters or receivers to share a single antenna.
- Dipole Antenna: A simple antenna consisting of two equal-length conductive elements, commonly used in HF and VHF.
- Directivity: The ability of an antenna to focus radio waves in a particular direction.
- Diversity Reception: A method of receiving signals using multiple antennas or frequencies to improve reliability.
- Downlink: The frequency or path used to transmit signals from a satellite to an earth station.
- DSP (Digital Signal Processing): A technology that enhances audio quality and signal processing in modern transceivers.
- DTMF (Dual-Tone Multi-Frequency): The signaling system used for telephone touch-tone dialing and repeater control.
- Dummy Load: A non-radiating resistive load used to test a transmitter without emitting RF signals.
- Duplexer: A device that enables simultaneous transmission and reception on different frequencies using the same antenna.
- Duty Cycle: The ratio of transmission time to total operating time, often expressed as a percentage.
E
- Echolink: A VoIP system that allows licensed amateurs to communicate via the internet.
- Effective Radiated Power (ERP): The total power radiated by an antenna, factoring in transmitter power and antenna gain.
- Electromagnetic Interference (EMI): Unwanted noise or signals that disrupt radio communication.
- Electromagnetic Pulse (EMP): A burst of electromagnetic radiation capable of damaging electronic equipment, often associated with solar flares or nuclear explosions.
- Elmer: An experienced ham radio operator who mentors newcomers.
- Emergency Communications (EMCOMM): The use of amateur radio for disaster response and emergency situations.
- End-Fed Antenna: A wire antenna with a feed point at one end, used for portable and stealth operations.
- E-Skip (Sporadic E Propagation): A radio wave propagation phenomenon where signals are reflected by sporadic ionized patches in the E-layer of the ionosphere.
- Ethernet Interface: A network connection used to link transceivers and accessories for remote operation.
- Extended Single Sideband (ESSB): A high-fidelity SSB transmission mode used for enhanced audio quality.
F
- Fade Margin: The additional signal strength needed to maintain communication during fading conditions.
- Faraday Cage: A shielding enclosure used to block electromagnetic fields.
- FCC (Federal Communications Commission): The U.S. regulatory agency responsible for amateur radio licensing and spectrum management.
- Feedline: The cable used to connect an antenna to a transmitter or receiver.
- Field Day: A major annual amateur radio event focusing on emergency preparedness and contesting.
- Filter: A circuit that removes unwanted frequencies from a signal.
- Final Amplifier: The last amplification stage in a transmitter, boosting RF power before transmission.
- Firmware: The embedded software that controls modern transceiver functions.
- FM (Frequency Modulation): A mode of modulation where the carrier frequency varies according to the audio signal.
- Footprint (Satellite): The geographical area where a satellite signal is accessible.
- Forward Gain: The increase in signal strength in a specific direction due to antenna design.
- Fox Hunt: A direction-finding activity where participants locate a hidden transmitter.
- Fractal Antenna: A multi-resonant antenna designed using self-similar geometric patterns.
- Frequency Coordinator: An individual or organization that manages repeater frequency assignments in a region.
- Frequency Counter: A device that measures the exact frequency of a signal.
- Frequency Multiplier: A circuit that increases the frequency of an RF signal.
- Front-to-Back Ratio: A measurement of an antenna’s ability to reject signals from the rear compared to the front.
G
- Gain: A measure of an antenna’s ability to direct radio waves, expressed in dBi or dBd.
- G5RV Antenna: A popular multi-band HF wire antenna designed for general-purpose amateur radio use.
- GHz (Gigahertz): A frequency measurement equal to one billion Hertz.
- Global Positioning System (GPS): A satellite-based navigation system used for tracking and positioning.
- Ground Loop: An unwanted electrical loop in a system that can introduce interference.
- Ground Plane Antenna: A vertical antenna using a radial ground system to improve performance.
- Ground Wave: A radio wave that propagates along the Earth's surface.
- Guillotine Match: A matching network for antennas, often used in impedance bridging.
H
- Half-Wave Dipole: A resonant antenna half the wavelength of the operating frequency.
- Handheld Transceiver (HT): A portable two-way radio used primarily for VHF/UHF communication.
- Harmonic: A multiple of a fundamental frequency that can cause unwanted interference.
- Helical Antenna: A spiral-shaped antenna used for circularly polarized signals.
- Henry (H): A unit of inductance in electrical circuits.
- High-Pass Filter: A filter that allows higher frequencies to pass while blocking lower ones.
- HF (High Frequency): The frequency range from 3 MHz to 30 MHz, used for long-distance communications.
- Homebrew Equipment: Radio equipment constructed by an amateur operator instead of commercially manufactured.
- Horizontally Polarized Antenna: An antenna that radiates with horizontal polarization, often used in HF bands.
I
- IF (Intermediate Frequency): A lower frequency to which a received signal is converted for easier processing in a superheterodyne receiver.
- Impedance Matching: The process of making the impedance of a transmitter, feedline, and antenna compatible to ensure maximum power transfer.
- Ionosphere: A layer of Earth's atmosphere that reflects and refracts radio waves, enabling long-distance communication.
- Ionospheric Propagation: The transmission of radio signals via reflection from the ionosphere.
J
- J-Pole Antenna: A simple end-fed omnidirectional antenna used primarily on VHF/UHF.
- JT65 & JT9: Digital communication modes optimized for weak-signal work on HF bands.
K
- K-Index: A measure of geomagnetic activity affecting HF propagation.
- Kilohertz (kHz): A unit of frequency equal to 1,000 Hertz.
L
- Log-Periodic Antenna: A broadband directional antenna often used for HF operations.
- Loop Antenna: A compact antenna formed in a loop shape, used for HF, VHF, and UHF.
- Low-Pass Filter (LPF): A filter that removes high-frequency signals and allows lower frequencies to pass.
M
- Mag Loop (Magnetic Loop Antenna): A compact, efficient antenna used for HF operations, known for its high-Q factor and reduced noise reception.
- Main Lobe: The primary direction in which an antenna radiates the strongest signal.
- Man-Made Noise (QRM): Interference from electrical sources such as power lines, motors, and electronic devices.
- Manual Gain Control (MGC): A user-adjustable control for regulating the receiver's gain.
- Matched Line: A transmission line with impedance equal to that of the connected equipment, minimizing signal loss.
- Megahertz (MHz): A frequency measurement equal to one million Hertz (cycles per second).
- Meteor Scatter: A propagation method using ionized meteor trails to reflect VHF signals over long distances.
- MHO: A unit of conductance, reciprocal of ohm.
- Mic Gain (Microphone Gain): A control that adjusts the sensitivity of the microphone input.
- Mini Beam: A small directional antenna designed for limited space environments.
- Mode: A method of modulating a radio signal, such as AM, FM, SSB, CW, or digital modes.
- Modulation: The process of varying a carrier wave to transmit voice, data, or other signals.
- Morse Code: A method of communication using dots and dashes to encode letters and numbers.
- Multi-Band Antenna: An antenna designed to operate across multiple frequency bands.
N
- Narrowband: A transmission with a small bandwidth, typically used for CW and some digital modes.
- Near Vertical Incidence Skywave (NVIS): A propagation method using high-angle radiation to enable short- to medium-range HF communication.
- Net (Network): A scheduled gathering of operators on a particular frequency to share information or conduct activities.
- Notch Filter: A filter used to remove a specific frequency or range of frequencies from a signal.
- Null: A direction in which an antenna’s radiation or reception is minimized.
- Numbered Radiograms: Standardized message formats used in formal traffic handling.
O
- Offset: The frequency separation between the input and output of a repeater.
- Omnidirectional Antenna: An antenna that radiates equally in all horizontal directions.
- Ohm (Ω): A unit of electrical resistance.
- Oscillator: A circuit that generates a stable frequency signal, essential for transmitters and receivers.
- Over-the-Horizon Radar (OTHR): A long-range radar system that uses HF radio waves reflected by the ionosphere.
- Overmodulation: Excessive modulation that distorts the transmitted signal.
- Over-the-Air Programming (OTAP): A method of updating radio settings remotely.
P
- Packet Radio: A digital mode using data packets for communication.
- Parasitic Element: An antenna element that is not directly connected but influences the radiation pattern.
- Passband: The range of frequencies that a filter allows to pass through.
- Patch Cable: A short coaxial cable used to connect radio components.
- Peak Envelope Power (PEP): The maximum power of a signal during its highest peak.
- Phased Array: An antenna system that uses multiple elements with adjustable phase differences to control radiation direction.
- PL Tone (Private Line Tone): A sub-audible tone used to access repeaters.
- Polarization: The orientation of an electromagnetic wave’s electric field, either horizontal or vertical.
- Portable Operation: Operating a radio station away from a permanent setup.
- POTA (Parks on the Air): An amateur radio activity where operators transmit from national and state parks.
- Power Supply: A device that converts AC mains power to DC for radio equipment.
- Preamp (Preamplifier): A low-noise amplifier used to boost weak signals before processing.
- Propagation: The behavior of radio waves as they travel through different media.
- PTT (Push-to-Talk): A button used to activate transmission.
Q (Q-Codes)
- QRM: Interference from man-made sources.
- QRN: Interference from natural sources, such as lightning.
- QRP: Low-power transmission, typically under 5 watts.
- QRV: Ready to communicate.
- QSB: Fading of a received signal.
- QSL: A confirmation of contact, often in the form of a card.
- QSO: A two-way radio contact.
- QTH: A location or station address.
R
- Radio Direction Finding (RDF): A method of locating radio signal sources.
- Radial System: A set of ground-mounted wires used to improve vertical antenna performance.
- Radioteletype (RTTY): A digital mode that uses Baudot code for communication.
- Receiver (RX): A device that detects and processes radio signals.
- Reflector: An element in a directional antenna that helps focus the signal.
- Repeater: A station that retransmits signals to extend communication range.
- Resonant Frequency: The frequency at which an antenna or circuit naturally oscillates.
- RF (Radio Frequency): The range of electromagnetic waves used for radio communication.
- RFI (Radio Frequency Interference): Unwanted radio signals that interfere with communication.
- RMS (Root Mean Square): A method of measuring signal voltage.
- Roger Beep: A tone that signals the end of a transmission.
S
- S-Meter: A receiver meter that indicates signal strength.
- SWR (Standing Wave Ratio): A measure of impedance matching in an antenna system.
- Scan Mode: A receiver function that cycles through multiple frequencies to detect signals.
- Semi-Duplex: A communication mode where transmission and reception occur on different frequencies but not simultaneously.
- Sideband: The portion of an AM signal above or below the carrier frequency used in SSB communication.
- Signal-to-Noise Ratio (SNR): The ratio of signal strength to background noise.
- Silent Key (SK): A term used to denote a deceased amateur radio operator.
- Skywave Propagation: The reflection of radio waves off the ionosphere for long-distance communication.
- Skip Zone: A region where radio signals cannot be received due to propagation effects.
- Solar Flux Index (SFI): A measure of solar activity that affects HF propagation.
- Split Operation: Operating on different transmit and receive frequencies.
T
- Tactical Callsign: A temporary callsign used for emergency communication or special events instead of a licensed callsign.
- Telemetry: The remote collection and transmission of data, commonly used in satellites and weather monitoring systems.
- Third Party Traffic: Messages transmitted on behalf of an unlicensed individual through an amateur radio operator.
- TNC (Terminal Node Controller): A device that facilitates packet radio communication by converting digital data into a format for radio transmission.
- Top Band: A nickname for the 160-meter amateur radio band (1.8 - 2.0 MHz), known for nighttime propagation and DX contacts.
- Transceiver: A combined transmitter and receiver in one unit, commonly used in amateur radio.
- Transistor: A semiconductor device used in electronic circuits to amplify and switch signals.
- Trap Antenna: An antenna that uses tuned circuits to operate efficiently on multiple frequency bands.
- Tropospheric Ducting: A VHF/UHF propagation phenomenon where temperature inversions create extended-range communication.
- Tuned Circuit: A circuit designed to resonate at a specific frequency, used in receivers, filters, and antennas.
- TX (Transmit): The process of sending a radio signal.
U
- UHF (Ultra High Frequency): The radio frequency range between 300 MHz and 3 GHz, commonly used for local amateur radio communication, including repeaters and satellite operations.
- Unun (Unbalanced to Unbalanced Transformer): A device used to match impedance between an unbalanced feedline and an unbalanced antenna.
- Upconverter: A circuit that increases the frequency of a received or transmitted signal.
- Uplink: The frequency used to transmit signals from an earth station to a satellite or repeater.
- UTC (Coordinated Universal Time): The global time standard used in logging contacts, also known as Zulu time.
- Utility Station: A non-amateur radio station used for commercial, government, or military communication.
V
- VFO (Variable Frequency Oscillator): A circuit that allows continuous tuning of a transceiver’s operating frequency.
- VHF (Very High Frequency): The radio frequency range between 30 MHz and 300 MHz, used in amateur bands such as 6 meters (50 MHz) and 2 meters (144 MHz).
- Vertical Antenna: A common omnidirectional antenna design used for HF, VHF, and UHF operation.
- Virtual Radar: A system that uses software-defined radio (SDR) to track aircraft transponders.
- Voice Keyer: A digital device that stores and plays recorded voice messages for contesting and net operations.
- VOX (Voice-Operated Transmit): A system that automatically switches a transceiver to transmit mode when the operator speaks.
W
- Wavelength: The physical distance between repeating points of a radio wave, determined by frequency.
- Weak Signal Communication: Communication techniques optimized for very low signal strength, such as FT8 and EME (Earth-Moon-Earth) contacts.
- Weatherfax (WEFAX): A system for receiving weather maps via shortwave radio.
- Whip Antenna: A flexible, vertical antenna commonly used for mobile and portable operations.
- Wideband: A signal that occupies a large portion of the frequency spectrum, such as FM or digital voice modes.
- Worked All Continents (WAC): An amateur radio award for making confirmed contacts on all continents.
- Worked All States (WAS): An award given to operators who contact all 50 U.S. states.
- Worked All Zones (WAZ): An award recognizing contacts with all 40 CQ zones worldwide.
- Windom Antenna: An off-center-fed dipole that allows multi-band operation.
X
- XIT (Transmit Incremental Tuning): A feature that allows fine adjustments to a transmitted frequency without affecting the receiver frequency.
- XTAL (Crystal Oscillator): A stable frequency generator used in transmitters and receivers.
Y
- Yagi Antenna: A highly directional antenna consisting of multiple elements that enhance gain in a specific direction, widely used for VHF/UHF and HF.
- YL (Young Lady): A term used to refer to a female amateur radio operator.
- YO (Yagi Optimized): A term used for optimized Yagi antenna designs for improved performance.
Z
- Zero Beat: The process of tuning an SSB or CW signal to match an exact frequency for proper reception.
- Zener Diode: A semiconductor device used to regulate voltage in power circuits.
- Zepp Antenna: A half-wave end-fed antenna originally used in Zeppelin airships, still used in amateur radio applications.
- ZL Special Antenna: A directional phased array antenna developed in New Zealand, often used on VHF.
- Zulu Time (UTC): The universal time standard used for logging and coordinating international radio contacts.
Why Counterpoises and Radials Should Not Touch the Coax Feedline
1. Preserving Coax Shield Integrity and Feedline Balance
The outer shield of a coaxial cable is designed to carry return currents back to the transmitter or receiver while shielding the inner conductor from unwanted RF. If a counterpoise or radial touches the coax shield:
- It may redirect RF energy onto the outer surface of the coax shield.
- This can excite common-mode currents, which are unwanted RF currents that travel back along the feedline’s exterior.
2. Preventing Common-Mode Currents
When radials or counterpoises contact the coax:
- The coax begins to radiate RF like part of the antenna.
This can lead to:
- Distorted radiation patterns
- RF in the shack (causing interference with electronics or even shocks)
- Elevated noise floor due to re-radiated RF coupling into the feedline
3. Maintaining Predictable Antenna Performance
Radials and counterpoises are meant to serve as the return path for RF energy in ground-plane or end-fed configurations. Their function is to provide a controlled low-impedance ground reference. Contact with the feedline can:
- Unintentionally alter the electrical length of the radials.
- Change the impedance characteristics of the antenna system.
- Lead to difficulty tuning or SWR instability.
4. Avoiding Coupling Issues and Signal Degradation
Coax cables are often run near other equipment. When the radials or counterpoises touch the coax:
- They can couple unwanted energy into other parts of the system.
- This can cause receiver desensitization, harmonic feedback, and other signal quality issues.
Best Practices
- Keep radials and counterpoises away from the coax, ideally perpendicular if possible.
- Use a choke balun (ferrite or air-wound) at the feedpoint to suppress common mode currents.
- In portable setups, route the feedline at a right angle from the feedpoint for at least several feet.
- Use insulated wire and elevated counterpoises when practical.
Summary
Touching radials or counterpoises to the coax feedline breaks the RF containment the
coax provides and introduces erratic system behavior. For optimal antenna efficiency, reduced interference, and consisten performance, keep them isolated and separated.